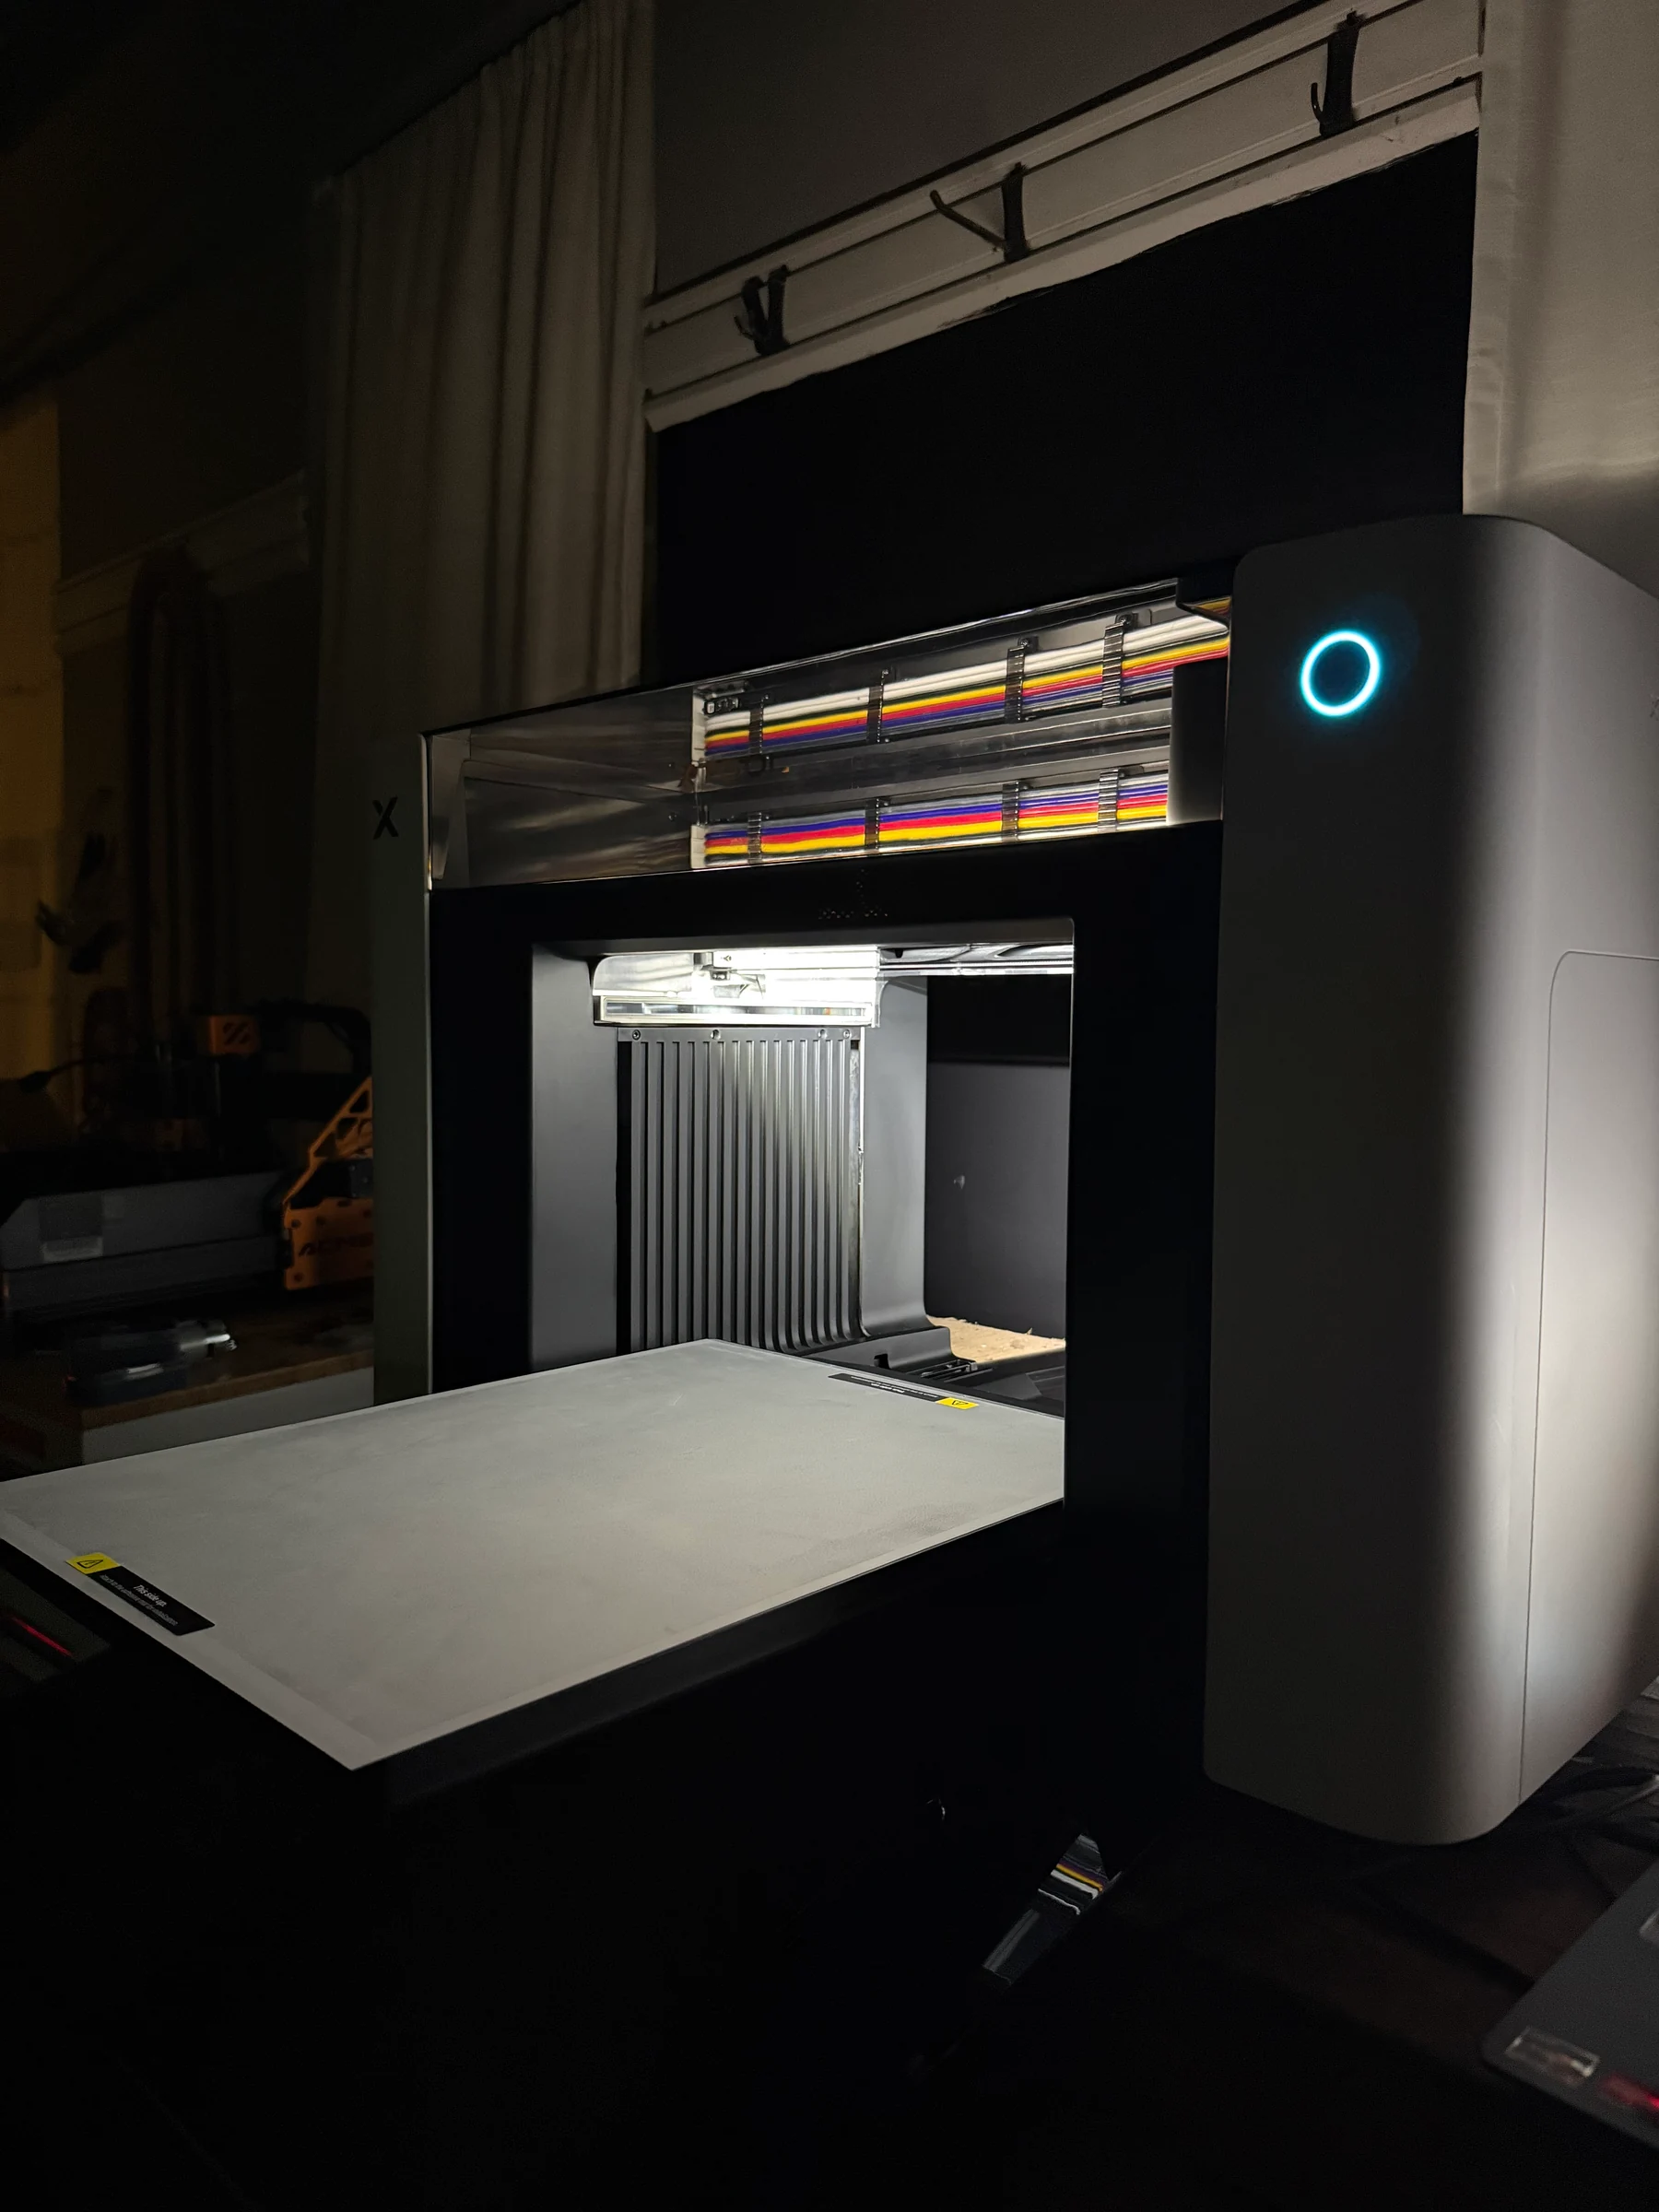
xTool O1 Omni Printer My DT + UV printer is running.
The xTool O1 Omni prints directly onto hard goods and makes UV DTF transfers. The DT + UV edition also prints garments and textile transfers. My xTool-supplied DT + UV Versatile printer is running, and testing is underway. This guide covers editions, bundle contents and workflow requirements; my controlled O1 results are still to come. Bundle prices checked September 22, 2026.
- xTool-supplied DT + UV Versatile
- Printer is mine to keep
- Accessory arrivals being recorded
xTool supplied our O1 Omni DT + UV Versatile Bundle, and we own and retain the printer. We purchased the eufyMake E1 and WonderPress with our own money. xTool does not see or approve our content before publication. Product links may earn The Crafty Catsman a commission at no extra cost to you. Receipt and ownership do not imply completed performance testing.
My O1 is up and running.
: our first paired luggage-tag test is published, and further testing is underway.
I sat there clicking through the tutorial and initial setup with a smile. The O1 gave me the same feeling I had moving from my K40 to the P2: more time to make things, less time spent on setup.
xTool supplied my DT + UV Versatile printer, and it is mine to keep. The photograph shows the machine powered on with its print bed extended.
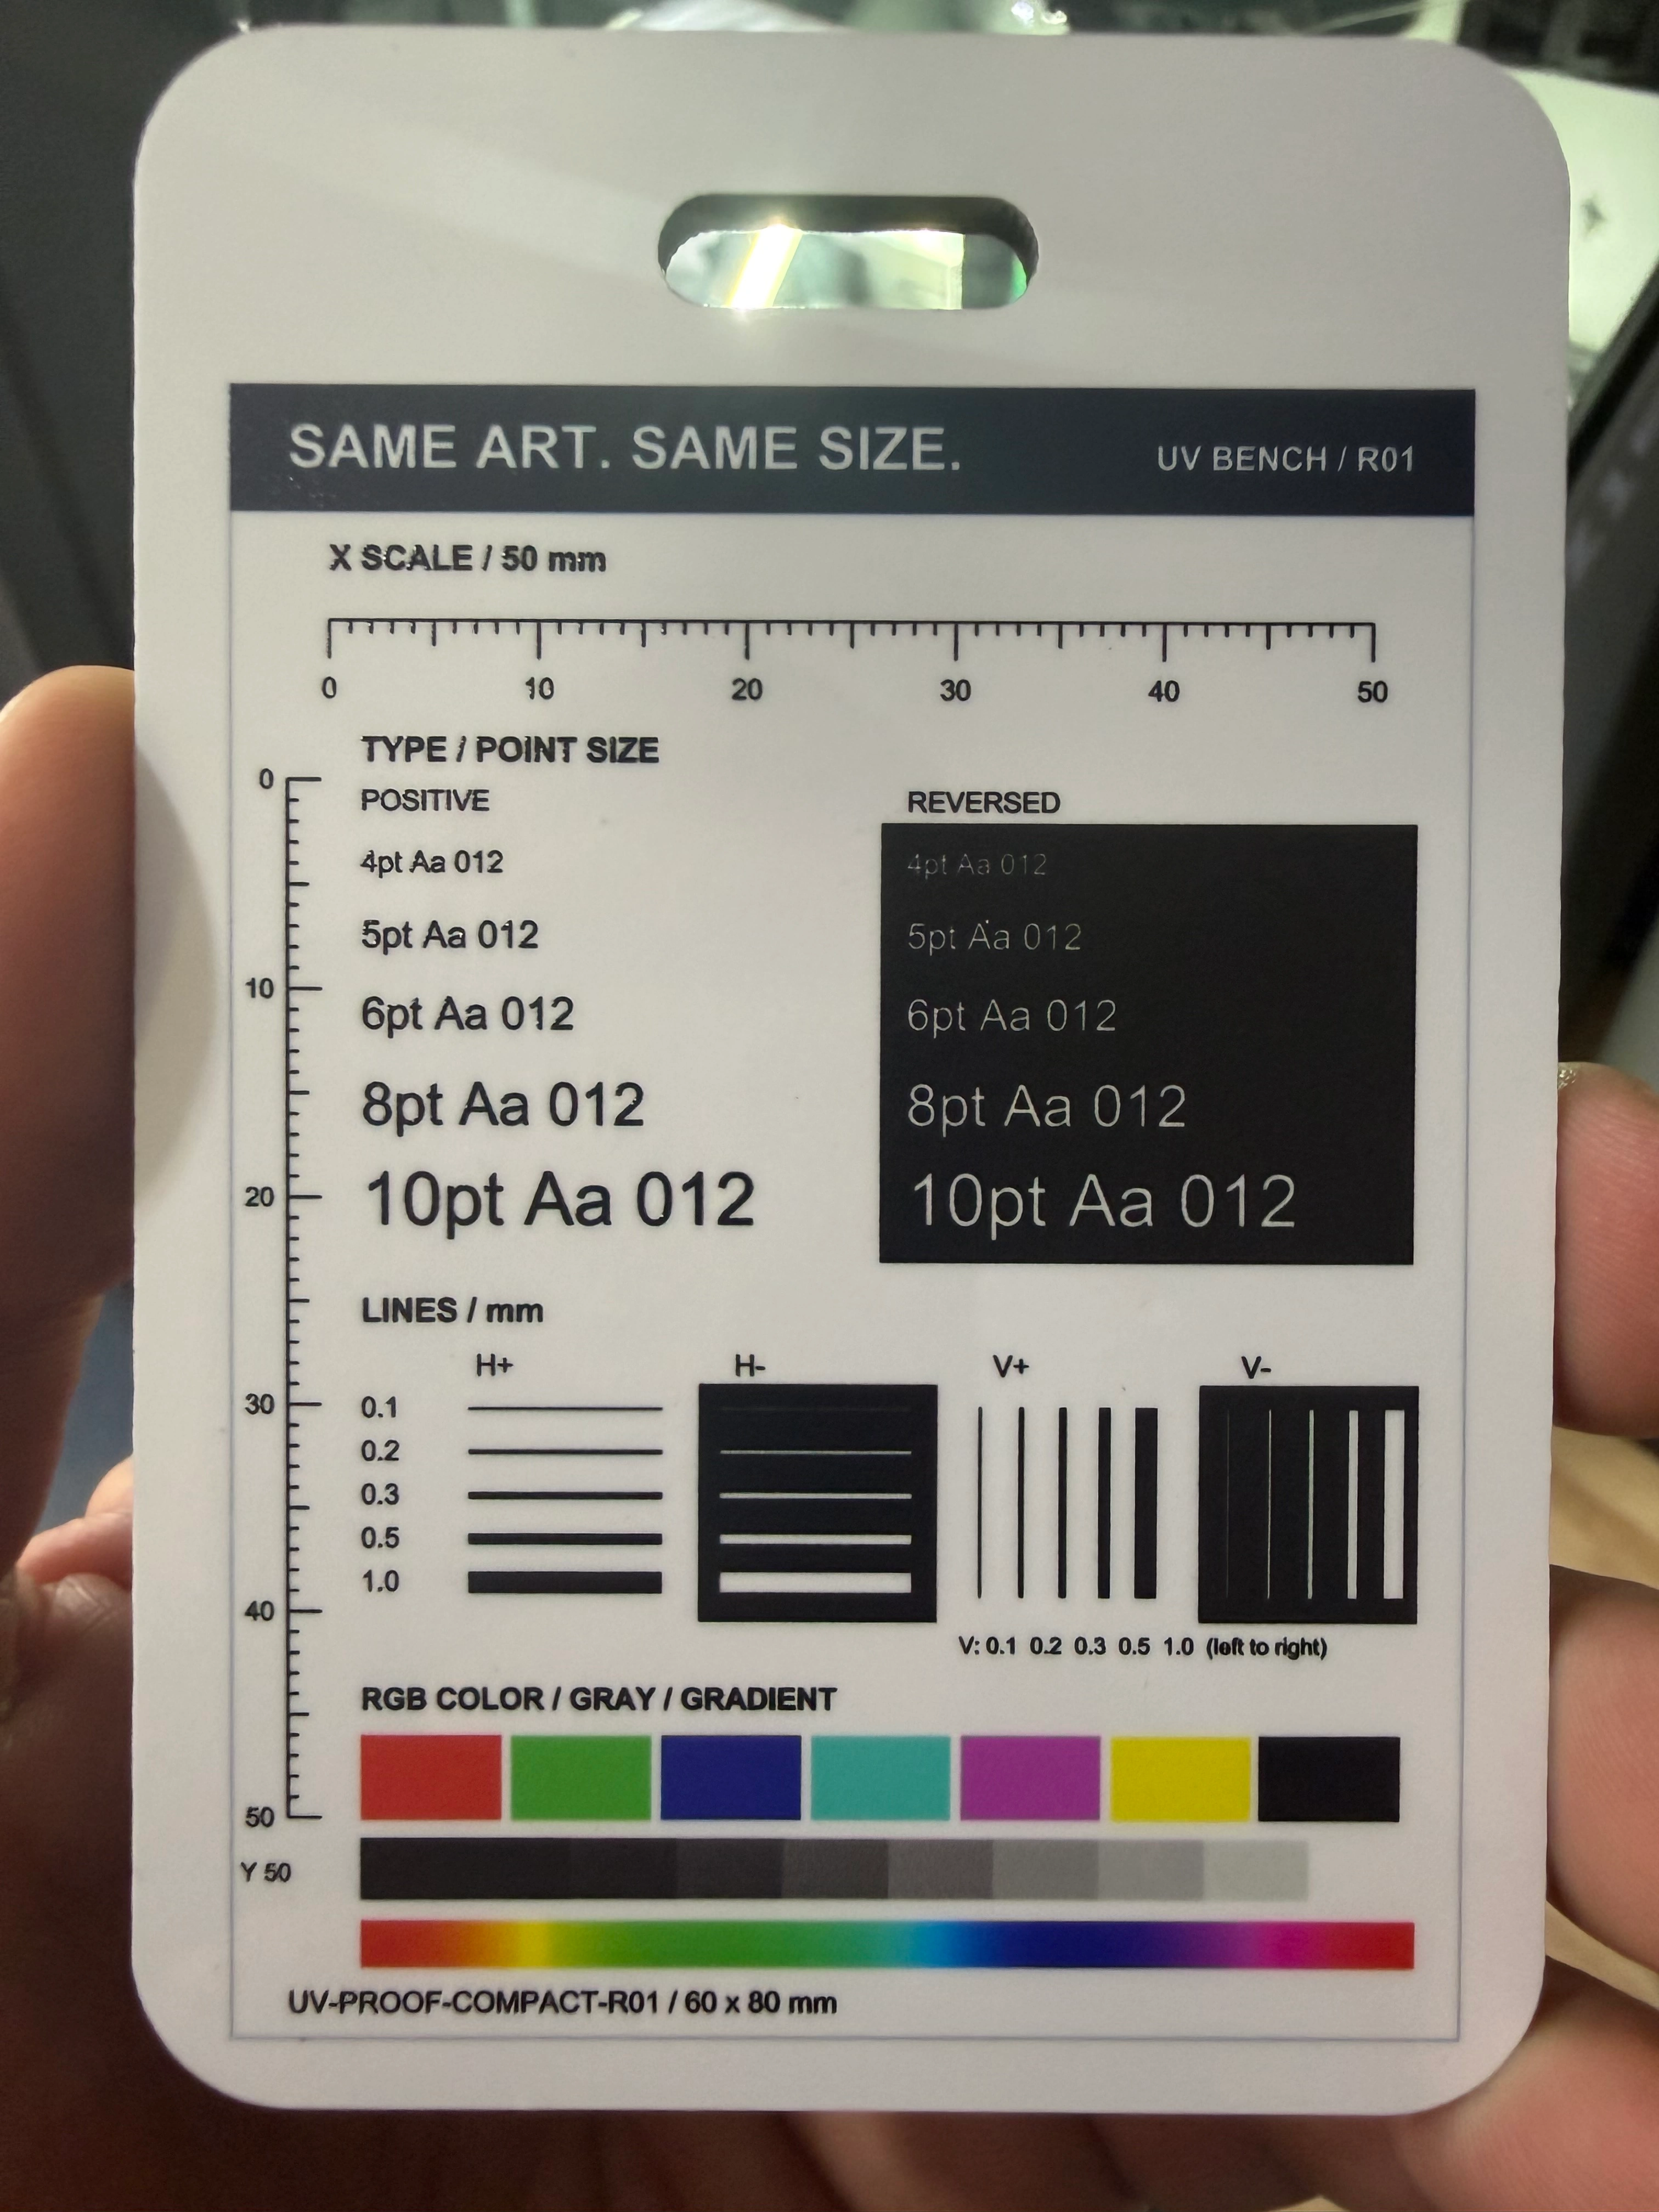
Our first O1 vs E1 luggage-tag test now includes both original print photos, the setup process and my first impressions. Measured running costs, repeatability and a broader winner remain open. My test protocol and run log explain how I’m documenting the work.
First print: the same artwork on my O1 and my eufyMake E1
Printed in my workshop, on both printers, on the same day.
For our shop, xTool’s established software ecosystem and easier setup are the clear advantages right now. The Omni felt more intuitive, and lining up the test image felt far faster. More difficult products and repeated placement will test how far that advantage carries.
See both luggage-tag prints, the settings I used and what one print per machine can’t tell us →
O1 editions and bundle prices
xTool sent me the DT + UV Versatile. Below, you can see what changes with each printer edition and accessory bundle.
September 22, 2026 update: 9 US preorder configurations, $2,499 to $5,249.
 Official xTool product image
These are different hardware editions. They cannot be converted into one another later.
DT + UV Versatile Bundle
$4,669 USD preorder
xTool compare-at: $4,669 (same as current)
Choose for planned garment work; specialty Dual UV effects are a different edition.
Estimated shipping from late November 2026. Accessories can ship separately.
 UV ink · CMYKWV
 Fabric ink · CMYKW
 Garment tray
Turns a supported cup inside O1.

Pairs A/B film for UV decals.

Feeds supported roll media.

Heat-sets garment prints and transfers.

Oven module listed with Print and Press Deluxe.
Official xTool images identify the equipment. The common printer view does not identify its installed ink system. Listed contents are separate from my accessory receiving log.
Compare all 9 configurations Prices, ink and included hardware
| Edition | Configuration | Included hardware and ink | Current price | Compare-at | Machine estimate |
|---|---|---|---|---|---|
| Single UV Edition | Standalone | Printer, UV ink (CMYKWV) | $2,499 | $2,499 | From mid November 2026 |
| Single UV Edition | Rotary Bundle | Printer, UV ink (CMYKWV), OR1 Rotary | $2,859 | $2,859 | From mid November 2026 |
| Dual-Head UV Edition | Standalone | Printer, UV Ink Essential + Expansion Sets | $3,299 | $3,299 | From mid November 2026 |
| Dual-Head UV Edition | Rotary Bundle | Printer, UV Ink Essential + Expansion Sets, OR1 Rotary | $3,659 | $3,659 | From mid November 2026 |
| Dual-Head UV Edition | Versatile Bundle | Printer, UV Ink Essential + Expansion Sets, OR1 Rotary, LM1 Laminator, RF1 Roll Feeder | $4,469 | $4,469 | From mid November 2026 |
| UV + DT Fabric Edition | Standalone | Printer, UV ink (CMYKWV), Fabric ink (CMYKW), Garment Tray | $3,499 | $3,499 | From late November 2026 |
| UV + DT Fabric Edition | Rotary Bundle | Printer, UV ink (CMYKWV), Fabric ink (CMYKW), Garment Tray, OR1 Rotary | $3,859 | $3,859 | From late November 2026 |
| UV + DT Fabric Edition | Versatile Bundle | Printer, UV ink (CMYKWV), Fabric ink (CMYKW), Garment Tray, OR1 Rotary, LM1 Laminator, RF1 Roll Feeder | $4,669 | $4,669 | From late November 2026 |
| UV + DT Fabric Edition | Print and Press Deluxe | Printer, UV ink (CMYKWV), Fabric ink (CMYKW), Garment Tray, OR1 Rotary, LM1 Laminator, RF1 Roll Feeder, WonderPress Heat Press, WonderPress Craft Oven | $5,249 | $5,249 | From late November 2026 |
Prices, compare-at prices, availability and shipping checked directly against xTool on September 22, 2026. Open the official listing ↗(paid link)
The printer and accessories may arrive at different times.
New preorder estimates checked September 22, 2026. These are shipping estimates, not promised delivery dates.
O1 printer
- Single UV
- From mid November 2026
- Dual UV
- From mid November 2026
- DT + UV
- From late November 2026
OR1 rotary
From mid November 2026
LM1 laminator
From late November 2026
RF1 roll feeder
From late November 2026
Add-on prices and order timing Separate purchases and existing orders
DT + UV Standalone plus OR1 and the LM1/RF1 combo: $4,796. DT + UV Versatile: $4,669. At this source check, the bundle was $127 less.
No RF1-only US offer was found when checked. Confirm a separate offer before planning to add it later. Tax, shipping, availability and changed contents can alter this comparison.
These accessory estimates are from xTool's O1 order page. Its separate OR1 page shows inconsistent older timing; confirm the selected offer and order estimate with xTool.
Deposit backers have a different fulfillment history from new direct preorders; the August 15 final-payment window has ended. Follow the estimate attached to your paid order. The July 15 launch-week report preserves the dated demonstrations and shipping record.
Check the exact setup at xTool.
The preview uses xTool’s September 22, 2026 listing. Choose your edition and bundle again on xTool; this link opens the O1 product page.
Affiliate link: I may earn a commission at no extra cost to you. xTool controls live price, stock, tax, shipping and checkout terms.
See O1 options at xTool12-month warranty60-day price guarantee
xTool’s product-specific O1 return policy restricts returns after ink is loaded. Read the terms before setup.
Return terms and extra costs
The product page flags a 7-day O1 return window. Its aftersale policy lists a 20% service fee for eligible returns on days 8–14 and restricts returns after ink is loaded. These are merchant terms and a manufacturer-stated support footprint; confirm eligibility, shipping charges, region, and final terms with xTool before ordering.
Taxes, regional availability, xToolCare and final checkout totals can change what you pay. The listed $399 replacement printhead is a part price, not an installed service quote.
The O1 printer and its accessories
xTool sent me the DT + UV Versatile bundle. Here’s what the listed equipment does, from printing to finishing. I have the printer and am recording each accessory as it arrives; I bought WonderPress separately. xTool now also lists a Print and Press Deluxe configuration that adds the WonderPress Heat Press and Craft Oven modules.
O1 Omni printer
Puts the design onto the object, film or garment.
Single UV covers standard UV work. Dual UV adds specialty UV effects. DT + UV adds fabric ink and garment printing. These are different hardware editions, not later software upgrades.
- Bundle contents
- Printer and edition-specific ink are listed in every bundle.
- Workflows that use it
- Manufacturer sources
OR1 Rotary Attachment
Turns a supported cup or cylindrical object for direct UV printing.
OR1 holds and rotates the workpiece inside the printer. A handle or an unsupported shape can limit the printable area; a UV DTF decal is a separate way to decorate those areas.
- Bundle contents
- Listed in Rotary, Versatile and Print and Press Deluxe bundles; separate from Standalone.
- Workflows that use it
- Manufacturer sources
LM1 Laminator
Pairs printed UV DTF film with its transfer film.
The printed design goes onto A film; lamination adds B film so the design can be transferred to a hard object. This is a different process from heat-setting a shirt.
- Bundle contents
- Listed in Dual UV and DT + UV Versatile bundles and in DT + UV Print and Press Deluxe; otherwise separate. The LM1 listing shows starter A/B film and application tools.
- Workflows that use it
- Manufacturer sources
RF1 Roll Feeder
Feeds supported roll media through the O1.
RF1 supplies the roll; LM1 handles lamination for the UV DTF route. A sheet decal does not need RF1. Confirm film type and dimensions before buying replacement rolls.
- Bundle contents
- Listed with LM1 in Versatile bundles and Print and Press Deluxe. The accessory listing shows starter roll film and flanges. No RF1-only US offer was found at the September 11 check.
- Workflows that use it
- Manufacturer sources
 White-ink pretreatment
 Color-ink pretreatment
 Spray bottle
Garment tray and pretreatment
Prepare and hold the fabric print area.
The tray and magnetic frame flatten and register the garment. Pretreatment is part of the direct garment process before printing, followed by heat-setting.
- Bundle contents
- The DT + UV package list includes the tray, white/color pretreatments and two spray bottles. Garments and a heat press are separate.
- Workflows that use it
- Manufacturer sources
UV inkDT fabric ink Waste-ink cartridge
 UV moisturizing liquid
 DT moisturizing liquid
UV ink, fabric ink and maintenance supplies
Match the ink system to the work and keep the printer ready.
UV ink serves hard goods and UV DTF. DT fabric ink serves DTG and textile DTF. Moisturizing liquid and waste-ink cartridges have maintenance jobs; they are not extra printing ink.
- Bundle contents
- Starter contents vary by edition. Check cartridge labels, quantities and replenishment needs against the package list before ordering duplicates.
- Workflows that use it
- Manufacturer sources
Craft Oven module · optionalWonderPress finishing modules
Provide heat-press and curing steps for garment workflows.
We bought WonderPress with our own money. The current O1 Print and Press Deluxe configuration lists the Heat Press and Craft Oven modules; the press and oven serve different steps, and neither replaces the documented film, powder, temperature, or timing requirements.
- Bought separately
- WonderPress Heat Press and Craft Oven are listed only in the DT + UV Print and Press Deluxe configuration. A suitable press you already own may cover the required heat-setting step for another bundle.
- Workflows that use it
- Manufacturer sources
About these pictures: xTool manufacturer images identify the equipment. They are not proof that an item has arrived or that we have tested it; our own receiving and setup photographs will follow.
The printer package also includes setup and maintenance items such as cables, baseplates, adhesive mats, filtration/exhaust parts and operating supplies. These are starter provisions, not a promise that every workspace or first project needs no additional preparation. See the xTool printer package list ↗(paid link) for the edition-specific list.
What you need for your first O1 print
A bundle can include the machine and attachments while the project still needs a blank, matching media or a heat press. Start with one of these six routes. Reuse suitable equipment you already own; check starter supplies before buying duplicates.
Highlight the parts used by each print route
O1 Omni printerThe starting point for every routeOR1 rotaryRotate the objectRead about this part ↓LM1 laminatorLaminate the filmRead about this part ↓RF1 roll feederFeed roll mediaRead about this part ↓Garment trayHold fabric flatRead about this part ↓Ink systemsUV ink shownRead about this part ↓WonderPress systemPersonally bought; modules being recordedRead about this part ↓Product images: xTool. These identify the equipment; my own receiving and setup photographs will follow.
Hard goods
Print directly onto a flat object, or turn a cylinder with OR1.
Print directly onto a flat blank
Coasters, signs, acrylic pieces, cases and small batches.
- UV ink
- Print on the blank
- Prepare a compatible blank
- Position on O1
- Print with UV ink
- Included hardware and starters
- Every O1 bundle lists the printer and its UV ink set. The base package also lists baseplates, adhesive mats and sample magnets.
- Prepare or buy separately
- Choose the blank, surface preparation and any substrate-matched primer. Confirm workspace, ventilation, protective supplies and software setup.
OR1, LM1, RF1 and a garment press are unnecessary for a flat UV job.
Print directly onto a cup or tumbler
Supported cylindrical hard goods held in the rotary.
- Hold and rotate
- Print inside O1
- Prepare the object
- Mount on OR1 inside O1
- Print while it rotates
- Included hardware and starters
- OR1 is listed in every Rotary and Versatile bundle and in Print and Press Deluxe. Standalone buyers need the attachment separately.
- Prepare or buy separately
- A workpiece within OR1 holding limits and the correct surface treatment. xTool sources disagree on the starter primer type; read the sachet and match it to the substrate.
A handle can prevent a complete direct wrap. Check the printable area before choosing the design.
UV DTF decals
Print the film, laminate it, then apply the design. RF1 adds roll feeding.
Apply a sheet of decals to hard goods
Branding on bottles, packaging and awkward shapes.
- Print A film
- Add B film
- O1 prints UV ink on A film
- Laminate with B film
- Apply the decal
- Included hardware and starters
- Versatile and Print and Press Deluxe include LM1. Standalone and Rotary buyers need a compatible laminating setup; verify any existing alternative against the process.
- Prepare or buy separately
- Matching A/B films, enough material for setup and a suitable receiving object. Check the LM1 starter film before buying more.
No RF1 is needed for sheet work. UV DTF is a hard-goods transfer, not a shirt transfer.
Make a longer run of UV decals
Repeated labels and transfers on supported roll media.
- Feed the roll
- Print A film
- Laminate
- RF1 feeds A film through O1
- LM1 adds B film
- Cut and apply transfers
- Included hardware and starters
- Dual UV and DT + UV Versatile and DT + UV Print and Press Deluxe list both LM1 and RF1. Other bundles need the roll and lamination equipment separately.
- Prepare or buy separately
- Correct roll type and width, matching B film, receiving objects and space for media handling. Allow for setup waste.
Do not infer a separate RF1 upgrade price from a bundle difference. Verify its available purchase configuration.
Garments
DT fabric ink adds garment printing. Heat-setting and transfer finishing happen separately.
Print directly onto a garment
Cotton-oriented shirts and totes using the fabric ink system.
- Prepare the garment
- Print with DT ink
- Heat-set
- Pretreat and press
- O1 prints on the garment tray
- Heat-set the print
- Included hardware and starters
- Every DT + UV bundle lists fabric ink and the garment tray. Print and Press Deluxe also lists the WonderPress Heat Press and Craft Oven modules. The tray package lists pretreatments and spray bottles.
- Prepare or buy separately
- A suitable garment, a compatible heat press and protection/application supplies. Deluxe lists the press; another bundle needs a suitable press already on hand or purchased separately.
A Craft Oven is not automatically required for a DTG-only job. Use settings matched to the garment, ink and press.
Heat-transfer a design onto fabric
Apparel transfers, distinct from UV decals for hard goods.
- Print DTF film
- Separate suppliesPowder + cure
- Press the transfer
- O1 prints fabric ink on DTF film
- Add powder and cure
- Heat-press onto the garment
- Included hardware and starters
- Every DT + UV bundle supplies the fabric-capable printer and its ink. Print and Press Deluxe also lists the WonderPress Heat Press and Craft Oven modules; textile DTF film and adhesive powder remain separate.
- Prepare or buy separately
- Compatible textile DTF film, adhesive powder, a documented curing method, heat press and garment. Confirm those supplies and capabilities before buying.
LM1 is not the textile DTF cure or garment press. The Deluxe listing includes a Craft Oven, but its settings still need to match the selected film, powder and process.
Check the hardware gap for all 9 configurations
Advertised hardware only, checked . “Listed” does not mean tested, received or ready without the preparation above. LM1 is the xTool laminating option; assess an existing alternative against the documented process.
| Bundle | Direct UV | Rotary UV | Sheet UV DTF | Roll UV DTF | DTG | Textile DTF |
|---|---|---|---|---|---|---|
| Single UV Standalone | Core hardware listed | Add OR1 Rotary | Add LM1 Laminator | Add LM1 Laminator + RF1 Roll Feeder | Unsupported edition | Unsupported edition |
| Single UV Rotary Bundle | Core hardware listed | Core hardware listed | Add LM1 Laminator | Add LM1 Laminator + RF1 Roll Feeder | Unsupported edition | Unsupported edition |
| Dual UV Standalone | Core hardware listed | Add OR1 Rotary | Add LM1 Laminator | Add LM1 Laminator + RF1 Roll Feeder | Unsupported edition | Unsupported edition |
| Dual UV Rotary Bundle | Core hardware listed | Core hardware listed | Add LM1 Laminator | Add LM1 Laminator + RF1 Roll Feeder | Unsupported edition | Unsupported edition |
| Dual UV Versatile Bundle | Core hardware listed | Core hardware listed | Core hardware listed | Core hardware listed | Unsupported edition | Unsupported edition |
| DT + UV Standalone | Core hardware listed | Add OR1 Rotary | Add LM1 Laminator | Add LM1 Laminator + RF1 Roll Feeder | Printer and tray listed. Prepare a compatible heat press. | Printer listed. Prepare film, powder, curing equipment and a heat press. |
| DT + UV Rotary Bundle | Core hardware listed | Core hardware listed | Add LM1 Laminator | Add LM1 Laminator + RF1 Roll Feeder | Printer and tray listed. Prepare a compatible heat press. | Printer listed. Prepare film, powder, curing equipment and a heat press. |
| DT + UV Versatile Bundle | Core hardware listed | Core hardware listed | Core hardware listed | Core hardware listed | Printer and tray listed. Prepare a compatible heat press. | Printer listed. Prepare film, powder, curing equipment and a heat press. |
| DT + UV Print and Press Deluxe | Core hardware listed | Core hardware listed | Core hardware listed | Core hardware listed | Core hardware listed | Printer listed. Prepare compatible textile DTF film and adhesive powder; confirm the included press and oven settings for the selected materials. |
These are manufacturer-described workflows, not our measured results. For the room and consumables around the machine, use our workspace and ventilation guide, material preparation guide and starter blanks guide.
How I’ll use WonderPress with the O1
We bought WonderPress with our own money; xTool supplied the O1. The press belongs beside the DT + UV garment workflow: prepare the garment, print with fabric ink, then heat-set using the instructions for that garment and equipment.
For textile DTF, powder curing is an additional step before the transfer is pressed. The Craft Oven is a separate WonderPress module. Our WonderPress guide explains the modules, current prices and the O1 pairing.
xTool’s DTG instructions(paid link) provide a garment-specific heat-setting example. They are manufacturer guidance; our pairing has not yet produced published test results.

My first day with the O1 Omni
Published
xTool supplied my O1 DT + UV Versatile, and it is mine to keep. These are my first impressions of the tutorial and initial setup. Testing is underway.
Friends, I love technology.
We find our way to the maker space for a unique combination of reasons. A big one for me is the sheer awe of living through one of the most exciting times in human history.
As an ’80s baby, I grew up alongside personal computers and watched the internet become part of everyday life. I connected with friends through secret codes on beepers and played Snake on my Nokia until my fingers hurt. I grew up in that tech evolution and have made it part of my job to stay on the bleeding edge.
From my blue K40 to the P2
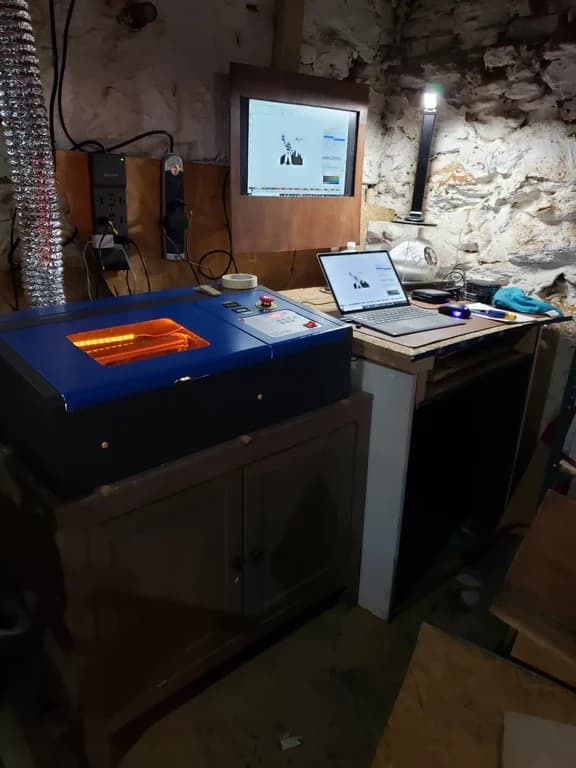
As many of you know, I started my laser journey where a lot of enthusiasts did: with a K40. That is my blue one in the old basement setup. The ability to use a laser was cool, but the tinkering took too much time.
When the xTool P2 was released, I was an early buyer. It was one of my most expensive shop purchases at the time, and it started my relationship with xTool. I had more time for creative expression and production, with less of it going into setup and troubleshooting.
Smiling through the setup
That context matters because it explains the feeling I had when I powered up the Omni for the first time. The sheer appreciation for the state of the industry settled on me like the fine layer of dust my workshop always seems to have—but in a good way.
I sat there clicking through the extremely well-laid-out tutorial and initial setup with a smile. On first impressions, the Omni gives me the same feeling the P2 did: a tool that leaves me more time to create.
I am in the same Facebook groups many of you are in, and all I could think was: why aren’t people talking about this? We quickly take for granted how simple and efficient things can feel when the software and hardware work well together.
My projector theory
I believe a product’s usefulness depends on how much effort it takes to use. If you own a projector, you probably know what I mean: it gets used when setting up movie night is painless.
The same idea applies in my workshop. With the O1, xTool’s software and the way it guides me through setup are already opening up possibilities. That is what I appreciated about moving from the K40 to the P2, too.
Even five or ten minutes of setup can be enough to put you off movie night.
Initial testing is underway, and I already have a lot I want to share. I am holding the print results and bigger conclusions for the full review.
For now, xTool hit a home run with the initial setup and first impressions. I can’t wait to share more of my thoughts here soon.
How I’m documenting the tests →What xTool and O1 owners report—and what I still need to test
A feature list, a creator’s project and a measured comparison answer different questions. Here is the basis for this guide, with our own results kept separate.
xTool’s product and support pages establish edition features, listed bundles, instructions and dated prices. They do not establish our measured speed, ink use or reliability.
Source dates are shown beside volatile facts.Eric Street and Marfa describe their own O1 projects, materials and process. Their published maker profiles identify the work and the people behind it.
Those projects are not our tests or a controlled comparison.We received and retain the xTool-supplied O1 DT + UV Versatile printer. We personally purchased the E1 and WonderPress. Individual accessory arrivals are still being recorded.
Receipt does not demonstrate performance.Our first luggage-tag photos and workflow observations are published in the O1 vs E1 comparison. Independent measurements remain open; future measured results will link to their settings, original evidence and limitations.
No O1 score or performance winner has been assigned.O1 projects from Eric Street and Marfa
Eric Street of LaserCraftworks and Marfa of ClaybyMO share projects from their own shops. These are creator-reported evidence, not a substitute for our own measured review. Ink yield, maintenance cost, repeatability and my O1-vs-E1 verdict still need my own bench work.
Not a vendor render: 12 x 16-inch canvas. Eric listed dual UV, white, spot-color fluorescent, CMYK, and a 38-minute run. Eric approved this page's use of his photos and process notes.
- Made onxTool O1 Omni UV Printer
- Project size12 x 16-inch canvas
- Print setupDual UV, white, spot-color fluorescent, and CMYK
- Run time38 minutes
Not a vendor render: Marfa printed the 13 x 13-inch design to DTF film, added powder, baked it, pre-pressed the heavy canvas tote, and then heat-pressed the transfer onto the bag. The white outline was intentional. Marfa approved this page's use of her photos and process notes.
- Made onxTool O1 Omni UV + DT Fabric Printer
- Transfer size13 x 13-inch DTF transfer
- Film workflowPrinted to film, powdered, baked
- ApplicationPre-pressed tote, then heat-pressed
Manufacturer features and the questions still open
Manufacturer-listed A3+ work area; allow for the actual blank, fixture and printable margins.
Clearance alone does not establish that a shape can be held or printed all the way around.
Manufacturer accuracy claim, not our measured result on transparent, curved or irregular objects.
A handled 40 oz tumbler cannot complete a full direct rotary wrap. xTool points to UV DTF for unreachable areas.
Single UV, Dual UV and DT + UV have different print and ink systems. A Versatile accessory set does not turn a UV-only printer into an apparel printer.
Automatic maintenance still consumes supplies. Actual idle waste, restart behavior and running cost need a recorded ownership history.
Project generation does not decide edition compatibility. The product FAQ lists P3, P2, P2S, S1, M2, and M1 Ultra; the O1 overview shows F2 Ultra and F2 Ultra UV workflow examples, leaving an unresolved official-source conflict for F Series models.
Alignment on awkward blanks, ink used during maintenance, restart behavior, head life, accessory waste and support experience still need owner evidence. See the published protocol and run record for how those observations will be documented.
O1 Omni or eufyMake E1?
The DT + UV O1 adds garment workflows to hard-goods UV work; Dual UV has a different specialty-ink system. E1 is our personally purchased UV printer. Decide first whether those additional workflows belong in your shop, then compare space, consumables, maintenance and the output you need.
Both printers are here. The O1 vs E1 comparison owns the detailed tradeoffs and future matched results. We are not declaring a performance winner from specifications or possession.
More UV printing guides


O1 Omni questions buyers are asking now.
Does the DT + UV Versatile bundle include WonderPress?
No. Versatile includes the DT + UV printer, UV and fabric ink, garment tray, OR1 Rotary Attachment, LM1 Laminator and RF1 Roll Feeder. The separate Print and Press Deluxe configuration adds the WonderPress Heat Press and Craft Oven modules. We personally purchased WonderPress for garment work; xTool supplied our O1.
What else should I prepare for my first O1 print?
Choose the workflow first. Flat UV needs a prepared compatible blank; rotary work also needs OR1. Sheet UV DTF needs matching A/B film and lamination; roll work adds RF1. DTG needs garment preparation and a heat press. Textile DTF needs fabric film, powder, curing and pressing. Check included starter supplies and equipment you already own before buying more.
Can I order the xTool O1 Omni now?
Yes. Direct U.S. preorders are open. 9 configurations are listed from $2,499 to $5,249. Current direct orders show estimated shipping from mid november 2026 for Single and Dual UV and estimated shipping from late november 2026 for DT + UV. The July 15 through August 15, 2026 final-payment period has ended; deposit backers should track their paid order and delivery estimate through xTool's email or account.
Did xTool rename the UV Printer to Omni?
Yes. As of September 22, 2026, xTool's live U.S. product page sells the machine as the O1 Omni. Some older xTool academy and specification pages still use xTool UV Printer, so both names may appear in older searches.
Is xTool O1 Omni the same machine as the xTool UV Printer?
Yes. The O1 Omni is the retail version of the desktop machine xTool introduced as the xTool UV Printer. The live product page now confirms the final name, three editions, prices, and bundle choices.
Should I wait for xTool O1 Omni or buy eufyMake E1 now?
Order O1 only if its edition, current preorder timing, and xTool workflow already fit your shop. Buy eufyMake E1 if you need an in-stock desktop UV printer immediately and accept its current consumable model. Wait for the same-bench comparison if ink use, maintenance, or repeatability could change your choice.
What facts should buyers not treat as final yet?
Machine and bundle prices, listed inclusions, ink pricing, a $399 replacement printhead part price, xTool's approximately 6 months to 1 year reference life, 3 months in all regions printhead coverage, 1 year in the US and Canada; 2 years in Europe, the UK, and applicable markets main-machine warranty, 12-month shelf life, closed-system policy, and two-week standby guideline are public. Final checkout, regional delivery, received starter-ink quantities, installed printhead cost, actual life, measured ink use, scratch durability, and production throughput are not final or independently proven.
Are there real xTool O1 Omni hands-on videos yet?
Yes, but the useful pool is still small. A few public launch-day videos include beta-unit use, while many others are launch news, promo reads, or product B-roll. Treat them as an early look, not a final review, until retail units have longer idle, maintenance, accessory, and support testing behind them.
What is the biggest O1 Omni red flag before retail proof?
The biggest red flag is the unmeasured ownership model. Ink prices, a $399 replacement printhead part price, a approximately 6 months to 1 year manufacturer reference life, and 3 months in all regions printhead coverage are public. Real ink consumption, cleaning waste, actual head life, installed replacement cost, required replenishment costs, support path, DT fabric-head reliability, reject rate, and long-term restart behavior can still change the real cost more than the machine discount.
Has The Crafty Catsman received the O1, and what has been tested?
Yes. Our xTool-supplied O1 Omni DT + UV Versatile printer is running in our workshop, and testing is underway. We own and retain the printer. Our first paired luggage-tag photos and workflow observations are published; controlled repeatability, yield and durability results remain pending. Our original workshop photo and first-day tutorial and setup impressions are published in this guide. We will document O1 workflows and compare matched hard-goods jobs with our personally purchased E1. Garment results belong to the O1 fabric workflow, not an E1 garment comparison.
Why does the Roll Feeder + Laminator update matter?
It makes O1 Omni more than a flatbed UV printer story. If the accessory claims hold up, the machine could serve sellable long-format products: sticker sheets, packaging labels, branded UV DTF transfers, canvas art, adhesive vinyl graphics, and metallic or holographic effects. The hard proof still lives in media width, feed reliability, lamination waste, transfer durability, and accessory/consumable pricing.
What does xTool mean by Laser Meets Printer?
xTool is positioning O1 Omni as part of the same software workflow as compatible xTool lasers. The buyer idea is simple: connect O1 Omni and the laser, split one design, let O1 print the full-color layer, and let the laser cut the outline without switching apps. The current product FAQ lists P3, P2, P2S, S1, M2, and M1 Ultra; F Series model-level availability remains unclear because the separate overview shows F2 Ultra examples while the FAQ says F Series support is still being added. Registration accuracy and setup time still need testing.
Is the xTool O1 Omni compatible with the xTool P3?
Yes. xTool's July 14 O1 Omni FAQ explicitly lists the xTool P3 for Laser Meets Printer and says the workflow will be available by production O1 delivery. O1 handles the color-print step and P3 handles laser cutting in the same software workflow. P3 is explicitly named, but we have not independently measured its registration accuracy or setup time.
Is the xTool O1 Omni compatible with the xTool P2?
Yes. xTool's July 14 O1 Omni FAQ explicitly lists the xTool P2 for Laser Meets Printer and says the workflow will be available by production O1 delivery. O1 handles the color-print step and P2 handles laser cutting in the same software workflow. The Crafty Catsman owns a P2 and will measure registration accuracy and setup time during the controlled O1 runs.
Is the xTool O1 Omni compatible with the xTool P2S?
Yes. xTool's July 14 O1 Omni FAQ explicitly lists the xTool P2S for Laser Meets Printer and says the workflow will be available by production O1 delivery. O1 handles the color-print step and P2S handles laser cutting in the same software workflow. P2S is named separately from P2, so its support is explicit rather than inferred from the earlier model.
Is the xTool O1 Omni compatible with the xTool S1?
Yes. xTool's July 14 O1 Omni FAQ explicitly lists the xTool S1 for Laser Meets Printer and says the workflow will be available by production O1 delivery. O1 handles the color-print step and S1 handles laser cutting in the same software workflow. S1 is explicitly named; the FAQ does not establish compatibility for every xTool diode laser.
Is the xTool O1 Omni compatible with the xTool M2?
Yes. xTool's July 14 O1 Omni FAQ explicitly lists the xTool M2 for Laser Meets Printer and says the workflow will be available by production O1 delivery. O1 handles the color-print step and M2 handles laser cutting in the same software workflow. M2 is explicitly named; registration accuracy and setup time still need an independent test.
Is the xTool O1 Omni compatible with the xTool M1 Ultra?
Yes. xTool's July 14 O1 Omni FAQ explicitly lists the xTool M1 Ultra for Laser Meets Printer and says the workflow will be available by production O1 delivery. O1 handles the color-print step and M1 Ultra handles laser cutting in the same software workflow. M1 Ultra is explicitly named; the FAQ does not extend that claim to every M1-family machine.
Is the xTool O1 Omni compatible with xTool F Series lasers?
Unclear from xTool's current pages. Checked August 17, 2026, the product FAQ lists P3, P2, P2S, S1, M2, and M1 Ultra and says F Series support will continue to be added, while the O1 overview shows F2 Ultra and F2 Ultra UV workflow examples. Treat those examples as marketing, not a model-level support guarantee, until xTool reconciles the pages or we test the workflow.
What is xTool O1 Omni One-Click AI Generator?
One-Click AI Generator is xTool's software layer for project generators such as music plaques, glasses-free 3D, stained glass, fridge magnets, embroidery-style looks, and oil-painting-style effects. It may speed up file creation, but the edition choice still depends on materials and production needs.
What configurations does the xTool O1 Omni come in?
xTool presents three O1 Omni editions: UV Edition at $2,499 pre-order / $2,499 compare-at, Dual-Head UV Edition at $3,299 pre-order / $3,299 compare-at, and UV + Fabric Edition at $3,499 pre-order / $3,499 compare-at. Dual UV adds relief, flexible white, and fluorescent effects. Fabric replaces those specialty UV options with DTG and textile DTF capability. Verify live checkout terms before paying.
Can a UV-only xTool O1 Omni be upgraded to print apparel later?
No. xTool's official FAQ says Single UV cannot be upgraded to Dual-Head UV or UV + DT Fabric, and the Fabric edition cannot be converted into Dual-Head UV. Choose for the materials you plan to print because the hardware and ink system are fixed after purchase.
Does the xTool O1 Omni print on shirts and fabric?
Only in the UV + Fabric Edition. That edition adds fabric printing paths on top of the UV hard-goods workflows. The UV-only editions print acrylic, wood, glass, metal, and other rigid or curved hard goods, but not apparel.
What does the O1 Omni garment printing workflow look like?
The garment workflow is pretreat, load, print, and dry. xTool’s instructions describe pretreating the print area, using the garment tray and magnetic frame to flatten and align the shirt, printing through the O1 Omni, then heat-setting the print. xTool's example heat settings are shown for WonderPress, so other heat presses need their own validation.
What is the difference between UV, UV DTF, DTG, and DTF on the O1 Omni?
UV Direct cures ink straight onto rigid surfaces (acrylic, wood, glass, metal) with no transfer step. UV DTF prints to a film first, then applies to curved or irregular hard goods like tumblers and bottles. DTG prints pigment ink directly into cotton garments for a soft hand feel. Textile DTF prints fabric ink onto film, adds adhesive powder and curing, then heat-presses the transfer onto compatible fabric. UV and UV DTF are available on every edition; fabric printing requires the UV + Fabric Edition.
What should we answer or test about the xTool O1 Omni?
Check the current answers first. If yours is not covered, send it to the desk. Every submission is reviewed before anything appears publicly; duplicates may be combined and questions may be edited for clarity.
- Check the published answers.
- Send what remains unresolved.
- Follow the sourced answer or bench result.
Only reviewed questions appear here.
No reader questions have been published yet. Questions appear here only after review; the FAQ above remains the complete published answer set.
Looking for the launch record?
The printer was first covered here as the xTool UV Printer. The announcement and naming history and July launch demonstrations remain available as dated reporting. Current bundle and shipping details are maintained above.
Where these facts came from.
Orders are open. The bench results land here first.
Our xTool-supplied O1 printer is here and ours to keep. Follow the first prints, setup notes, E1 comparison, and ink-use tests as each run is recorded. Controlled O1 results are still to come.
- Setup feel without launch-day gloss
- Same-shop O1 Omni vs EufyMake E1 checks
- First-print checks and material surprises
- Ink, odor, safety, and maintenance notes
- Plain-English buying guidance as facts open up